


I will be leaving links throughout the article with the code I used from my GitHub repo and if you have any questions or comments feel free to reach out to me on LinkedIn. Let’s get started!
Prerequisites:
- Boto3 installed on your local machine
pip3 install boto3 - AWS CLI installed on your local machine
pip3 install awscli - AWS account with permissions
Scenario:
Our DevOps engineering team often uses a development lab to test releases of our application. The Managers are complaining about the rising cost of our development lab and need to save money by stopping our (for this example) 3 ec2 instances after all engineers are clocked out.
Use your script in a Lambda function using Python 3.7 or higher runtime. Make sure the lambda runs on a set schedule daily. No one should be working in the Dev environment past 7 pm. (Note: to test you may need to modify the time accordingly so you aren’t waiting for 7 pm)
1. Creating our EC2 Instances
To start this project we will be creating 3 EC2 instances and giving them tags for our Lambda function to refer to later. To create our EC2 Instances we will use the following code:

Note that in line 12 for my tags I use “Test1” as my key and “Test1pair” as my value, you can use whatever you’d like for your key and value just be sure to remember them as we will need to reference back to these later. Now that we have our EC2 Instances up and running let’s move on to creating an IAM policy and role for this project.
2. Creating IAM Policy and Role
To start we will head over to IAM, select policies, then create policy, and enter the following JSON code under the JSON tab.

Now, let’s move on to review, add our name (I used “EC2_Scheduled_Policy” which we will be referencing later), and click create policy.
Once our policy has been created we can move on to creating a role by selecting Roles, create role, and under use cases select Lambda. Click next, then under permissions policies search for the name of the policy we just created and check the box next to it, click next to give it a name (I used “EC2_Scheduled_Role” which we will be referencing later), and then click create role.
3. Creating our First Lambda Function
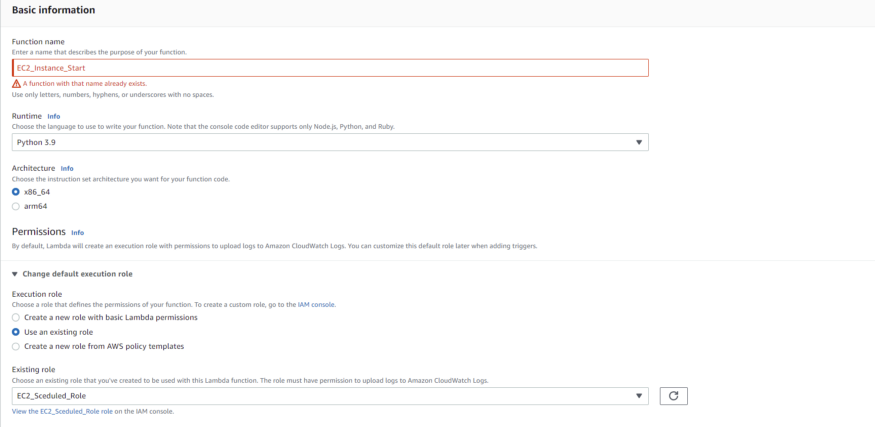
Now that we have created our IAM policy and role let’s move on to creating our Lambda function. To do so we will head on over to Lambda and select create function, let’s enter in a name for our Lambda function (I used “EC2_Instance_Start” ), then under the Runtime dropdown, we will select Python 3.9. Finally, we will click the dropdown Change default execution role and select Use an existing role then select the role we just created which in my case will be “EC2_Scheduled_Role”.
Your setting should look like this:
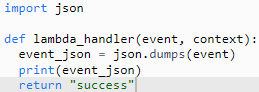
Once this is created we will enter the following code, remember to click Deploy to save the code we wrote, and once we have deployed our code let’s click the Test button to make sure everything is working properly.
After clicking the test button you will see a page pop up like this, for now, let’s just name it test and make no changes.

If the code runs successfully you should have a screen that looks like this:

If you run into an error double-check that all of your settings match what I have above for your Lambda function. Otherwise, if we get a success message then we can move on!
Once this is complete let’s scroll up and click on Monitor then View logs in CloudWatch. In CloudWatch under Log streams click on the last log CloudWatch received, if Lambda and CloudWatch are communicating properly our log will show our “Hello World” we printed and will look like this:

4. Creating our EventBridge Rule
Now let’s head over to EventBridge and select create rule, give it a name (I used “EC2_Stop_Instances”) then click next. For the next step lets Scroll down to Event Pattern and under AWS Service search for EC2 then under Event Type select EC2 Instance-state change notification. Next, directly under that we will choose specific state(s) and choose stopped, this will now send us a notification when our instance state has changed to stopped.
Your settings should look like this:

Once we have this properly configured click next and under Select a target we will choose Lambda Function from the dropdown and we will select the function we created in Lambda(in my case I chose my “EC2_Instance_Start” Lambda function.

We can skip adding tags and move on to review, if everything looks good then we go ahead and select create EventBridge rule.
5. Configuring our Lambda Function
Now that we have created our EventBridge rule let’s head over to CloudWatch and select our lambda function, under Log streams let’s check all of the boxes for our past events and delete them so we have a clean screen to look at for when we trigger our next test event.
Now let’s quickly head over to our Lambda function, enter and deploy the following code. We do not need to test it quite yet.
To trigger our event let’s go back to the EC2 instances that we have running and stop them by selecting all three of the running EC2s we created and clicking Instance state then stop. Note that the event in CloudWatch will not be triggered until the instance state has reached “stopped”.
Before we input our code to our Lambda function, remember the page “Configure test event” that popped up after clicking Test on our print(“Hello World”) command? We will need to input some JSON code there, to do so we will need to be in CloudWatch and we will need to select our Lambda function. In Log streams we should see a new log showing that our EC2’s Instance state has changed to “stopped”, click on the log and open the second timestamp from the top. It should look something like this:

The JSON code in this event shows that our EC2 instance has stopped. Copy this code as we will need it for our Lambda function to know that when it receives this message from CloudWatch it has to run the code that we input into the function. Now that we have copied this JSON code let’s head back over to our Lambda function, click the arrow next to the Test button, select Configure test event then paste in our JSON code like this:

6. Inputting our Script to Start our EC2 Instances
Now that we have our EC2s, IAM roles/policies, and our CloudWatch all communicating we can finally start inputting our Python code into Lambda to automate the starting and stopping processes for our instances. To do so let’s enter, deploy, and test the following code in our Lambda function:

Now that we’ve done that, if we head over to our EC2 instances and refresh the page we should see that they all have started running! Success! So we got our Lambda function to start running our EC2 instances, but we want them to start and stop on a schedule from 8:00 am to 7:00 pm Monday through Friday. So let’s do it!
7. Scheduling a Time to Start our EC2s
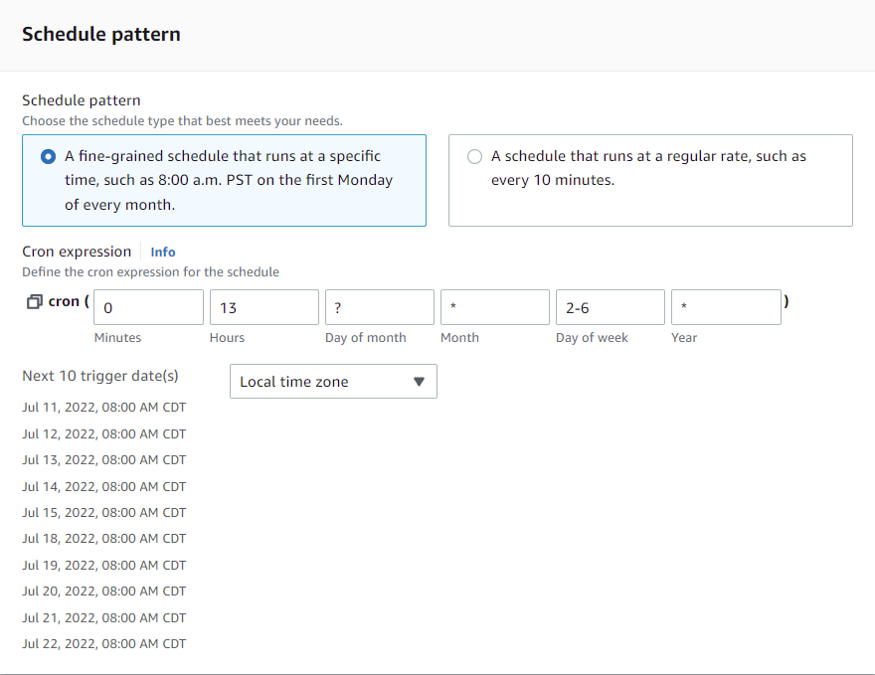
Head over to EventBridge to start this process and select the rule we previously created. In the top right let’s click edit and on the first page under Rule type select Schedule then Next. Now we will see what we call a “Cron expression”, for this example I will be starting the EC2s at 8:00 am so for my local time zone this is how I will have my Cron expression set up.
We can keep all of our other settings the same so just click next until you see update, then update the rule.
8. Creating our Second Lambda Function
Now that we have our EC2s starting when we want them to, let’s finish up with getting them to stop when we want as well. To do this we will head back over to Lambda and select create function, this one I will name “Ec2_Instance_Stop” and we will set it up the same as the one before by entering and deploying this code again:

Once we have done that let’s click on Monitor, View logs in CloudWatch, and make sure it has something logged for your new Lambda function. If so we are good to go! Now let’s go back to our first Lambda function and click the arrow next to test, Configure test event, and now we will copy the JSON code from earlier and paste it into our new Lambda function’s configure test event page and save it. Now go back to the first function again, copy the Python code from there and paste it into our new Lambda function. We only need to make two changes to this code, which will be changing the Values from Stopped to Running and the InstanceIds from start to stop. It should look just like this, and if it does let’s click deploy and test our function.

9. Scheduling a Time to Stop our EC2's
Now then we will head over to EventBridge for our final step. In EventBridge let’s select create rule which I will name mine “EC2_Running_Instance”, then click on schedule. For the Cron expression if I want the instance to stop at 7:00 pm for my local time zone then this will be my input:

Now that we have a time set up for this rule lets select Next and under Select a target we will again select the Lambda function and for the Function tab we will select our second Lambda function which for me was “EC2_Instance_Stop”, now we select Create rule and WE ARE DONE!
Congratulations! We now have a Lambda function created using Python, EC2, CloudWatch, and EventBridge that will start and stop our instances on a set schedule of our choosing!
Share with your friends and followers
Start blogging about your favorite technologies, reach more readers and earn rewards!
Join other developers and claim your FAUN account now!


User Popularity
23
Influence
1k
Total Hits
1
Posts

Read, Learn, Know, Teach
Hand curated newsletters for Developers, private Slack with like minded people, podcasts, job offers, news and more!

Only registered users can post comments. Please, login or signup.